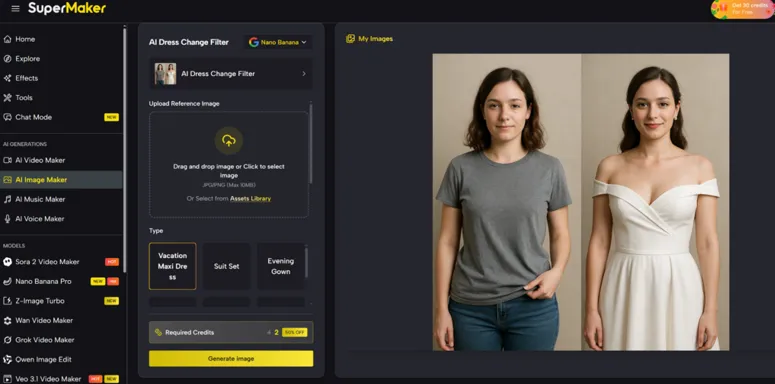
You’ve probably tried at least one “outfit swap” tool that promised instant results—only to give you a flat, pasted-on shirt that ignores your body angle, lighting, or the way fabric should drape. That gap between what you imagine and what the image shows is exactly why I paid attention to Dress Change AI: it’s positioned less like a novelty filter and more like a workflow—upload, choose a style, generate—designed to keep the result feeling like a real photo, not a collage.
This isn’t a miracle button, and it doesn’t replace real styling or a professional shoot. But if your goal is to explore looks, quickly prototype a vibe for a profile photo, or preview styling for content, it’s one of the more practical ways to “try on” outfits without learning Photoshop.
The Real Problem With Outfit Swaps
Most outfit-edit experiences break in predictable places:
- Lighting mismatch: the new clothes look brighter or duller than the face and background.
- Wrong geometry: sleeves don’t respect arm angles; waistlines float; hems bend unrealistically.
- Edge artifacts: hair, hands, and accessories create jagged borders or cutouts.
- Overconfidence: the UI suggests it’s effortless, but you end up regenerating five times anyway.
The good news is: these are solvable problems—if the system treats the edit as “image understanding + generation,” not “overlay + blend.”
How Dress Change AI Works (In Plain English)
At a high level, Dress Change AI behaves like an image-to-image transformation.
- You upload a photo (ideally clear and well-lit).
- You select a clothing style from a curated set of options.
- The system generates a new version of your image where the outfit is replaced.
What makes this approach different from basic editors is the implied pipeline: it has to infer your pose, body shape, and scene lighting, then produce clothing that fits those constraints. When a tool gets those three right, you stop seeing “a dress pasted onto a person,” and you start seeing “a person wearing a dress.”
A Quick “Before vs After” Mental Model
Here’s the most helpful way I’ve found to think about outfit-changing AI:
- Before: You have a photo with a specific camera angle, shadows, and body posture.
- After: You want the same photo, same person, same scene—only the clothing has changed.
That sounds trivial until you remember clothing is one of the most complex visual surfaces: folds, seams, specular highlights, and layered occlusion (hair over collar, hands in front of fabric, bags crossing the torso). Any system that improves realism here isn’t just painting texture—it’s trying to simulate how clothing should behave in that scene.
Where Dress Change AI Fits Best
Dress change tools tend to shine when you use them for the right kind of task:
- Style exploration: “Does a structured blazer fit my vibe or feel too formal?”
- Content creation: quick variations for thumbnails, profile pics, mood-board posts.
- E-commerce prototyping: rough lookbooks before you invest in a full shoot.
- Personal branding: exploring “business casual vs street vs evening” for different platforms.
If you’re trying to replicate an exact designer outfit down to stitching, you may want a different workflow (more on that below).
Comparison Table: Dress Change AI vs Other Common Options
| Comparison Item | AI Video Generator Agent | “Clothes Changer” (Upload Outfit Image) | Manual Photo Editor (Cutout/Overlay) |
| Best for | Fast style swaps using preset looks | Trying a specific clothing item from an image | Precise, manual control |
| Inputs needed | 1 person photo | Person photo + outfit image | Person photo + time/skill |
| Control level | Medium (choose style, regenerate) | Higher (you provide the outfit reference) | Highest (but manual) |
| Realism goal | Natural fit + lighting alignment | Fit + alignment to a reference garment | Depends on your skill |
| Time to first result | Fast | Medium | Slow |
| Learning curve | Low | Low–medium | High |
| Typical failure points | Complex poses, busy backgrounds, hands/hair overlaps | Outfit photo quality and angle mismatch | Edges, shadows, fabric realism |
| When it feels “worth it” | You need quick iterations | You have a very specific look to try | You need pixel-perfect art direction |
The practical takeaway: Dress Change AI is strongest when you want speed and consistency—you’re selecting a style, not managing a complex editing pipeline. If you already have a reference garment image and want the system to aim for that exact item, the “upload outfit image” route is usually more appropriate.
How to Get Better Results (Without Pretending It’s Magic)
1. Start with a photo that helps the model
The “quality of input determines quality of output” rule is not marketing—this is the most real limitation in the entire category.
Try to use:
- clear, well-lit photos
- full body or at least torso clearly visible
- minimal motion blur
- uncomplicated backgrounds if possible
2. Use regeneration strategically
If the first result is close but not perfect, a second or third generation often improves edge blending and texture consistency. The trick is to regenerate without changing everything—keep the same base photo and adjust only the outfit style or option.
3. Treat hands, hair, and bags as “hard mode”
Long hair over shoulders, hands on hips, cross-body bags, and layered jackets are where most outfit swaps reveal their seams. If you’re evaluating realism, test one photo with these challenges—but don’t judge the tool solely on the hardest case.
A More Honest View of “Realism”
Some pages in this space talk about fabric physics and perfect folds as if it’s guaranteed. A more reliable way to phrase it is:
- In many straightforward photos, the results can look convincingly photorealistic, especially at social-media viewing sizes.
- In edge cases (crowded backgrounds, extreme poses, heavy occlusion), the model may produce distortions or “almost-right” artifacts.
- You’ll occasionally need multiple attempts to land on the version that feels natural.
That’s not a flaw unique to this tool—it’s the current reality of generative editing. And being upfront about it makes your expectations (and your workflow) much healthier.
What I Like About This Approach (Based on the Workflow Itself)
What stood out to me is the low-friction decision-making: instead of prompting your way into a good result, you choose from curated styles and iterate. That matters because many people don’t actually want to become prompt engineers just to test a new outfit idea.
It also quietly encourages a better habit: you evaluate outcomes, not prompts. In practice, that’s how most creative teams work anyway—generate options, compare, pick the one that fits the goal.
Limitations You Should Expect
1. Results vary with photo quality
Low light, compression artifacts, and heavy shadows reduce consistency.
2. The “same person” effect can drift
Sometimes the face and outfit feel like they belong together, but fine identity cues (skin texture, small facial details) may drift slightly between generations.
3. Precision fashion isn’t the goal
If you need exact brand-accurate garments, you’ll want a reference-image workflow or a more controlled editing pipeline.
A Neutral Note on the Broader Tech Trend
It’s worth remembering: this product category is riding on fast improvements in generative image/video models and diffusion-style architectures. The field is moving quickly—but temporal consistency, identity preservation, and fine-detail control remain active challenges across the board. If you think of Dress Change AI as a practical application of that progress—rather than a perfect replacement for photography—your experience will be far more satisfying.
Who This Is For
If you want a tool that helps you explore style options quickly, without turning the process into a technical project, Dress Change AI is a sensible place to start. You’ll still want to be selective about your input photos, and you should expect a bit of iteration. But for everyday “try this look on me” use cases, the workflow is aligned with how people actually create: test, compare, refine—then keep what feels like you.